

Definition Box
How to master the Tunnel Strategy (definition) for smarter trading decisions: The Tunnel Strategy is a trend-following approach that uses two longer-period exponential moving averages (often 144 EMA and 169 EMA) to form a “tunnel” for trend direction, plus a short EMA (commonly 12 EMA) to confirm momentum before entries. (See a popular “Vegas Tunnel” example on TradingView.)
Introduction: What Is the Tunnel Strategy?
The Tunnel Strategy helps traders make cleaner decisions by answering one question first: Is this market trending, and if so, which way? It does that using an EMA “tunnel” as a trend filter, and a short EMA as a momentum confirmation tool – so you trade with structure instead of chasing candles.
It can be applied across instruments (forex, indices, commodities, crypto), but it tends to be more reliable on higher timeframes (H1 to Daily) where market noise is reduced.
Key Takeaways
- The tunnel (144/169 EMA) acts as a trend filter: above = bullish bias, below = bearish bias.
- A short EMA (often 12 EMA) adds momentum confirmation to reduce false signals.
- The method performs best in trending markets and can struggle in choppy, ranging conditions.
- Your results depend heavily on risk management (stop placement + position sizing + consistency).
- This is a rules-based framework, not a guarantee.
How the Tunnel Strategy Works
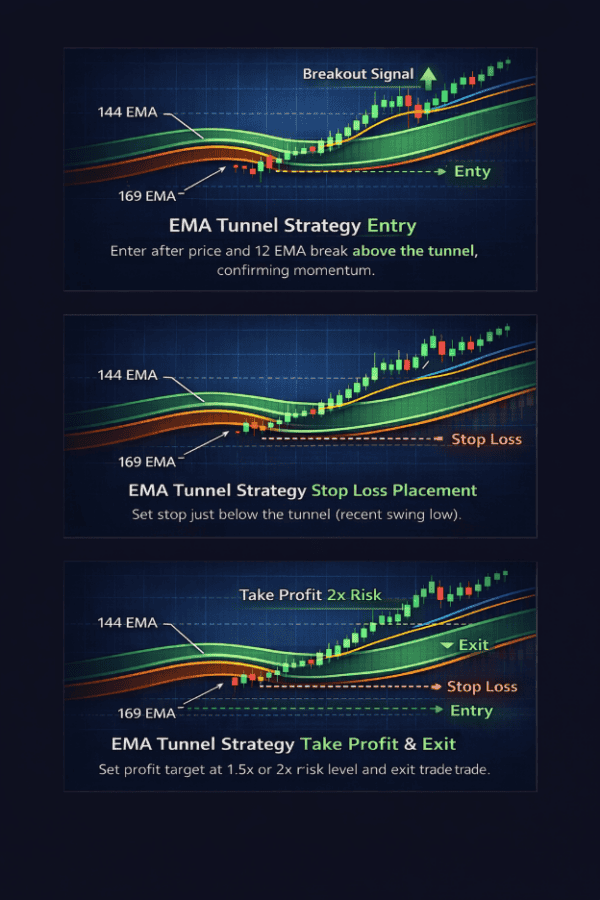
1) Build the Tunnel With Two Longer EMAs
Most tunnel variants use 144 EMA and 169 EMA to form the “tunnel.” (You’ll see this configuration referenced frequently in the classic Vegas Tunnel community and scripts, including this TradingView example.)
Use price relative to the tunnel to define your bias:
- Price above the tunnel → bullish trend bias
- Price below the tunnel → bearish trend bias
This is not prediction. It’s filtering – you’re choosing to participate only when the market is already behaving in a directional way.
2) Confirm Momentum With a Short EMA (Often 12 EMA)
A short EMA (often 12 EMA) acts as a momentum filter:
- Long bias: price and the 12 EMA are above the tunnel
- Short bias: price and the 12 EMA are below the tunnel
This “double confirmation” helps reduce the classic problem of a single candle spiking through an average and immediately reversing.
Quick clarity: an EMA weights recent prices more heavily than a simple moving average, making it more responsive to current price action. (See Investopedia’s EMA definition.)
3) Choose Your Entry Style: Pullback or Breakout
Once trend + momentum align, you generally have two clean entry types:
A) Pullback Entry (patient, often higher quality)
- Wait for price to retrace back toward the tunnel
- Look for rejection (price struggles to push through the tunnel against your trend bias)
- Enter when momentum resumes in the trend direction (your “go” signal)
B) Breakout Entry (faster, but easier to fake out)
- Enter when price decisively breaks through tunnel boundaries
- Confirm the 12 EMA supports the breakout direction
Pick one entry style and stick to it. Consistency beats “perfect entries.”
A Simple Rule Set You Can Actually Follow
If you’re new to the method, start simple:
- Bias: Only take longs above the tunnel; only take shorts below the tunnel.
- Momentum: Confirm 12 EMA is on the same side as your bias.
- Entry: Use either pullback-to-tunnel or clean breakout – don’t mix rules mid-trade.
- Invalidation: If price crosses and holds through the tunnel against your position, treat it as a warning that your setup may be invalid.
- Risk: Predefine stop and size before you enter.
This keeps the strategy repeatable and prevents “analysis drift.”
Risk Management: The Part That Makes It Sustainable
The Tunnel Strategy is not a certainty machine. Your edge comes from combining structure with risk controls.
Stop Loss Placement
Two common approaches:
- Tunnel-based stop: Place the stop just beyond the opposite side of the tunnel (gives the trade room, but still defines invalidation).
- Structure-based stop: Place the stop beyond the most recent swing high/low that would invalidate the setup.
Take Profit Targets
- R-multiple: Aim for at least 1.5R (1.5x your risk), then refine as you gain data.
- Trend continuation: Scale partial profits at structure levels while staying in the trend as long as the bias remains intact.
Position Sizing
Keep your risk per trade small and consistent. Many traders use a fixed percentage or fixed currency amount to keep emotion out of the equation.
Reminder: regulators repeatedly warn that leveraged products (like CFDs) are high-risk and not suitable for everyone. Trade only with money you can afford to lose, and prioritize risk controls. (See the FCA’s consumer communications on CFD risk, e.g. this FCA press release.)
Example: Tunnel Strategy in Action (Conceptual)
Let’s say EUR/USD is trending upward:
- Price is above both 144 EMA and 169 EMA (tunnel)
- The 12 EMA is also above the tunnel
- Price pulls back toward the tunnel, then rejects lower prices and resumes upward momentum
Entry: on the resumption signal (pullback entry) or on a clean breakout (breakout entry)
Stop loss: below the pullback swing low (or beyond the tunnel, based on your rule set)
Take profit: at least 1.5R, or into prior highs/structure levels
The purpose is repeatability: you’re executing rules, not reacting emotionally.
When the Tunnel Strategy Works Worst
Tunnel strategies tend to struggle when the market is ranging or choppy:
- Price crosses back and forth through EMAs repeatedly
- Breakouts fail quickly
- You get “whipsawed” into small losses
A high-quality decision is sometimes no trade. If you want to learn how to spot choppy conditions earlier, build your chart-reading and execution discipline through the structured pathways and mentoring inside Smart Online Trader.
FAQs – Tunnel Strategy Explained
Is the Tunnel Strategy suitable for beginners?
Yes, because it provides clear rules for trend direction, confirmation, and risk. Beginners should start on demo and focus on consistency before increasing risk.
Which timeframes work best?
Higher timeframes (H1, H4, Daily) often filter noise better than very low timeframes.
Can it be automated?
Yes. Many traders implement rule-based versions on platforms like TradingView once the entry/exit logic is fully defined.
Does this strategy work in ranging markets?
Less reliably. The tunnel is a trend method. In sideways markets, you may need additional filters – or simply stand aside.
Why use EMAs instead of SMAs?
EMAs weight recent prices more heavily, which can make them more responsive to trend changes. (See Investopedia’s EMA explanation.)
What’s the easiest version to start with?
Use the tunnel for bias, the 12 EMA for confirmation, one entry type (pullback or breakout), and fixed risk per trade. Then journal outcomes and refine.
Conclusion: Consistency Through Structure
The Tunnel Strategy isn’t a magic bullet – but it does give traders what most lack: a structured decision framework. By combining a trend filter (the tunnel), momentum confirmation (short EMA), and disciplined risk management, it turns price chaos into a repeatable process you can execute with clarity.
Compliance Notice
This article is for educational purposes only and does not constitute financial advice, investment advice, or a recommendation to trade. Trading involves risk and may not be suitable for all participants. Past performance is not indicative of future results. Always use risk management and only risk capital you can afford to lose.
